
💡 Before adding a supply, create the ingredients and products you plan to store.
Add a supply
Add your first supply of ingredients and products to a storage location so Poster can calculate the cost of dishes and drinks and help you track product stock.
- Open Inventory → Supplies in the management console and click Add.
- Specify the date and time when the products arrived at the storage location.
- Select a supplier or add a new one.
- Select the storage location where you will store the products.
- In the Payment field, click + Add payment and select the account you will use to pay for the supply.
- Select ingredients or products and specify their quantity, price, or the total supply amount.
- Click Save.

💡 If you plan to pay for the supply later, work with suppliers on credit.
💡 To add boxes or packages to a storage location, use ordering units. You can also add supplies directly at the POS if you prefer to receive products without using the management console.
Add a storage location
By default, Poster creates one storage location — “Storage location 1”. Add separate storage locations, such as “Bar” and “Kitchen”, if you work with multiple places where you store products.
💡 Additional storage locations are available on the Mini, Business, and Pro plans.
To create a new storage location:
- Open Inventory → Storage locations in the management console and click Add.
- Enter the storage location name and, if needed, its address.
- In the Locations field, select the location to which you want to link the storage location.
- Click Save.
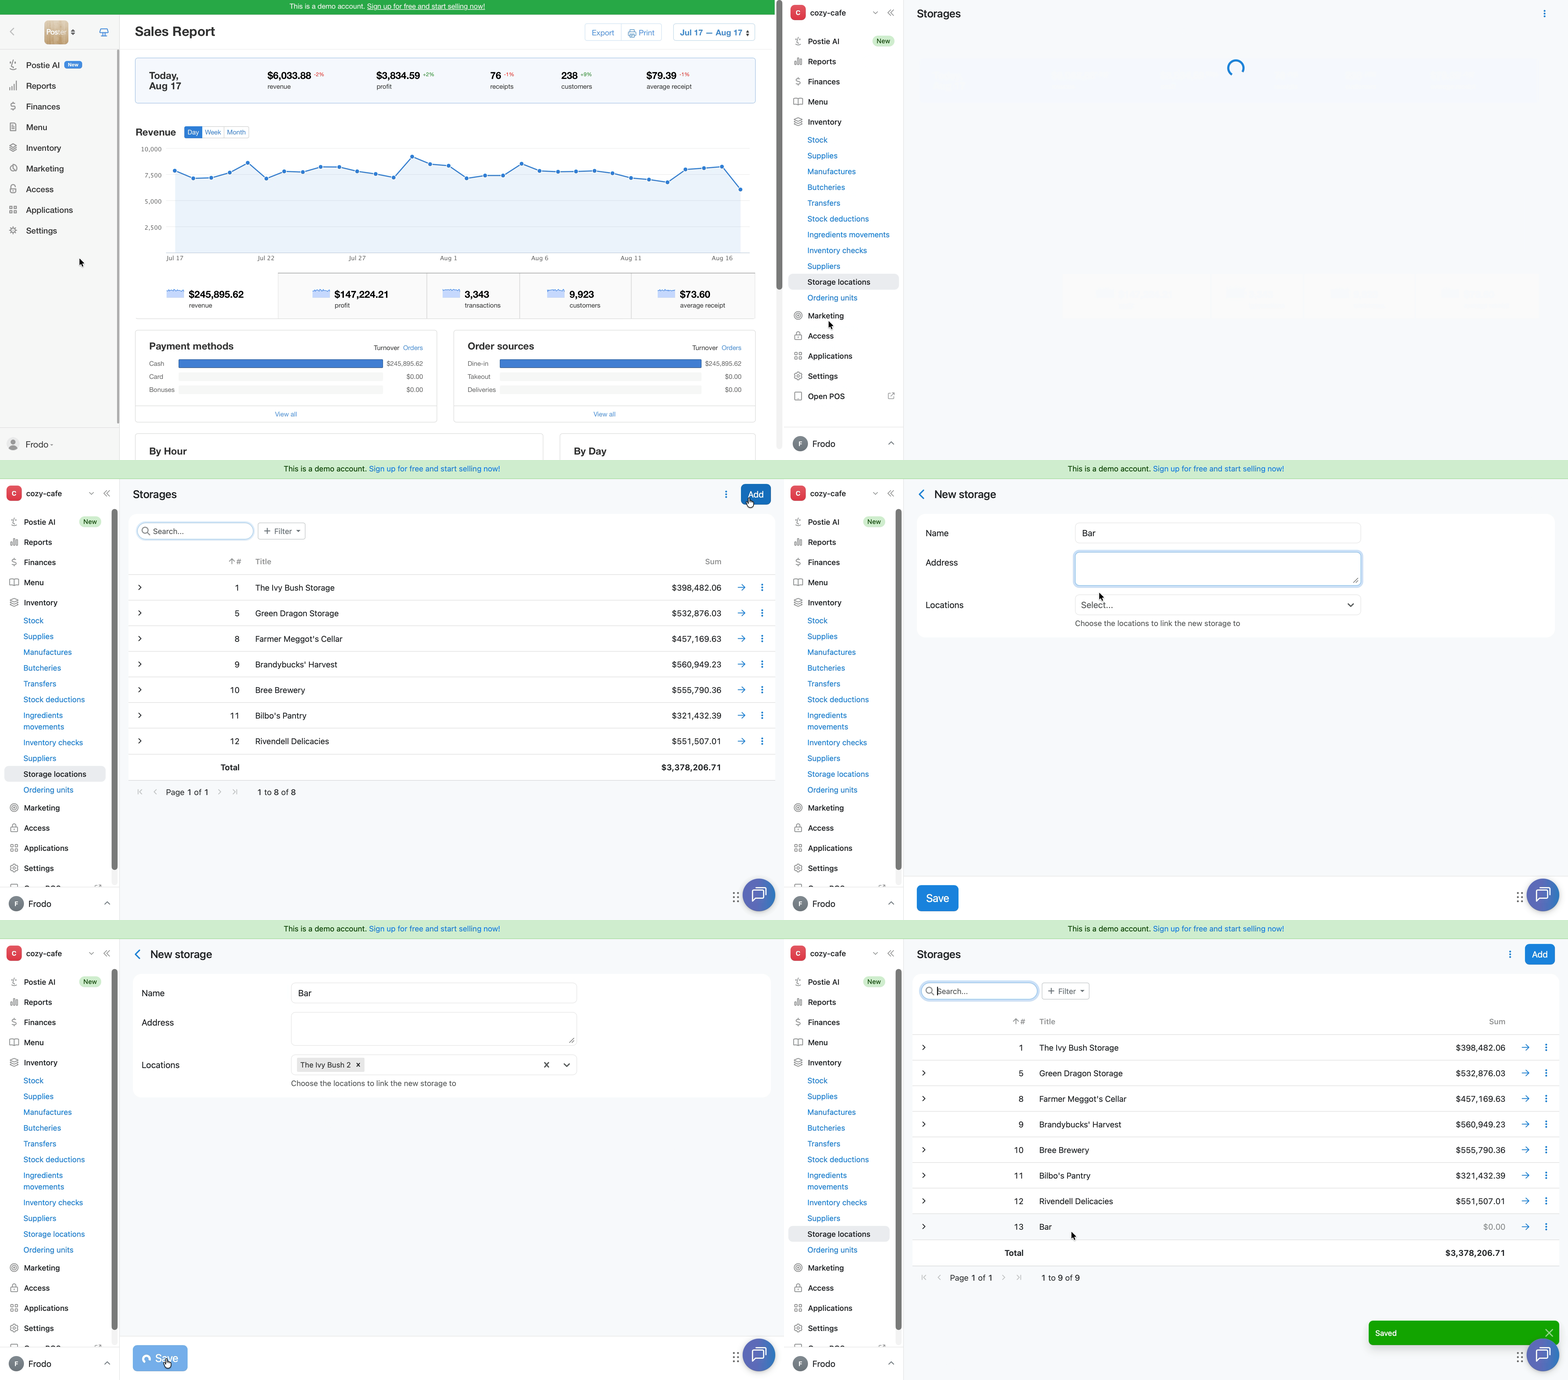
If a storage location is linked to a location, Poster automatically deducts ingredients and products from it when you make sales at the POS. If no storage location is linked to a location, products are not deducted automatically.
💡 If you store the same ingredients in different storage locations of a location, configure deduction rules to specify where to deduct them from.
Transfer products between storage locations
Transfer ingredients, products, as well as dishes and preparations connected to manufacture between storage locations. You cannot transfer a dish or preparations that is not connected to manufacture.
- Open Inventory → Transfers in the management console and click Add.
- Select the date and time of the transfer.
- Specify the storage location you are moving the products from and the one you are moving them to.
- Select the products and specify their quantity.
- Click Save.
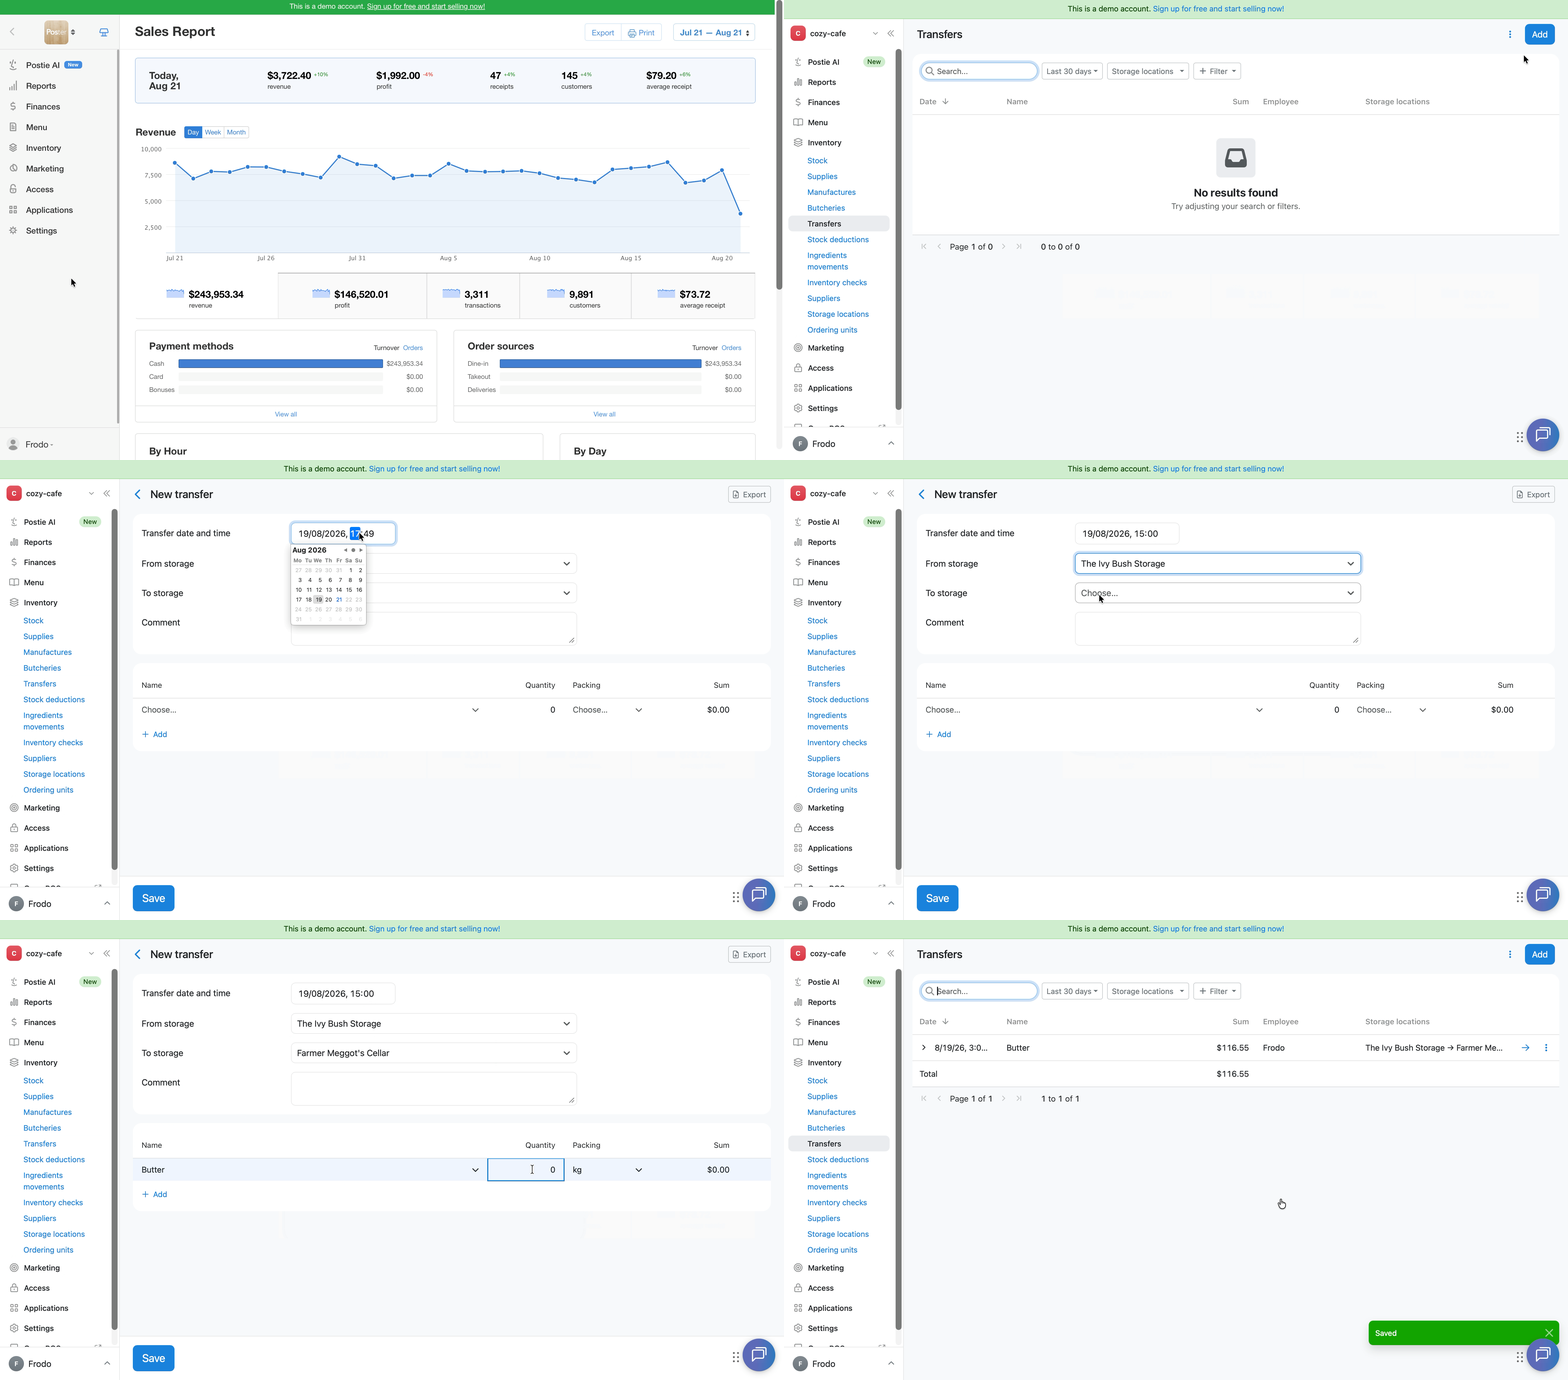
☝️ Create a transfer even if the sending storage location has a zero or negative stock balance. If the balance becomes negative after the transfer, Poster will show a notification on the screen. Check the balances later and adjust them if needed.
💡 To create transfers directly at the POS, connect the POS Transfers integration. Employees with the required access will then be able to create requests and complete transfers in the POS app.
Make a manual stock deduction
Poster automatically deducts ingredients when you make sales at the POS. If a product has spoiled, expired, or you used it to test a recipe or feed employees, create a manual stock deduction.
- Open Inventory → Stock deductions in the management console and click Add.
- Specify the date and time of the deduction.
- Select the storage location from which you will deduct the products.
- In the Reason field, select a reason from the list or click Add to create a new one.
- If needed, add a comment to provide more details about the reason. For example, select “Recipe development” and add the comment “Preparing the summer menu”.
- Add products, ingredients, dishes, preparations, or dish modifiers and specify their quantity.
- Click Save.
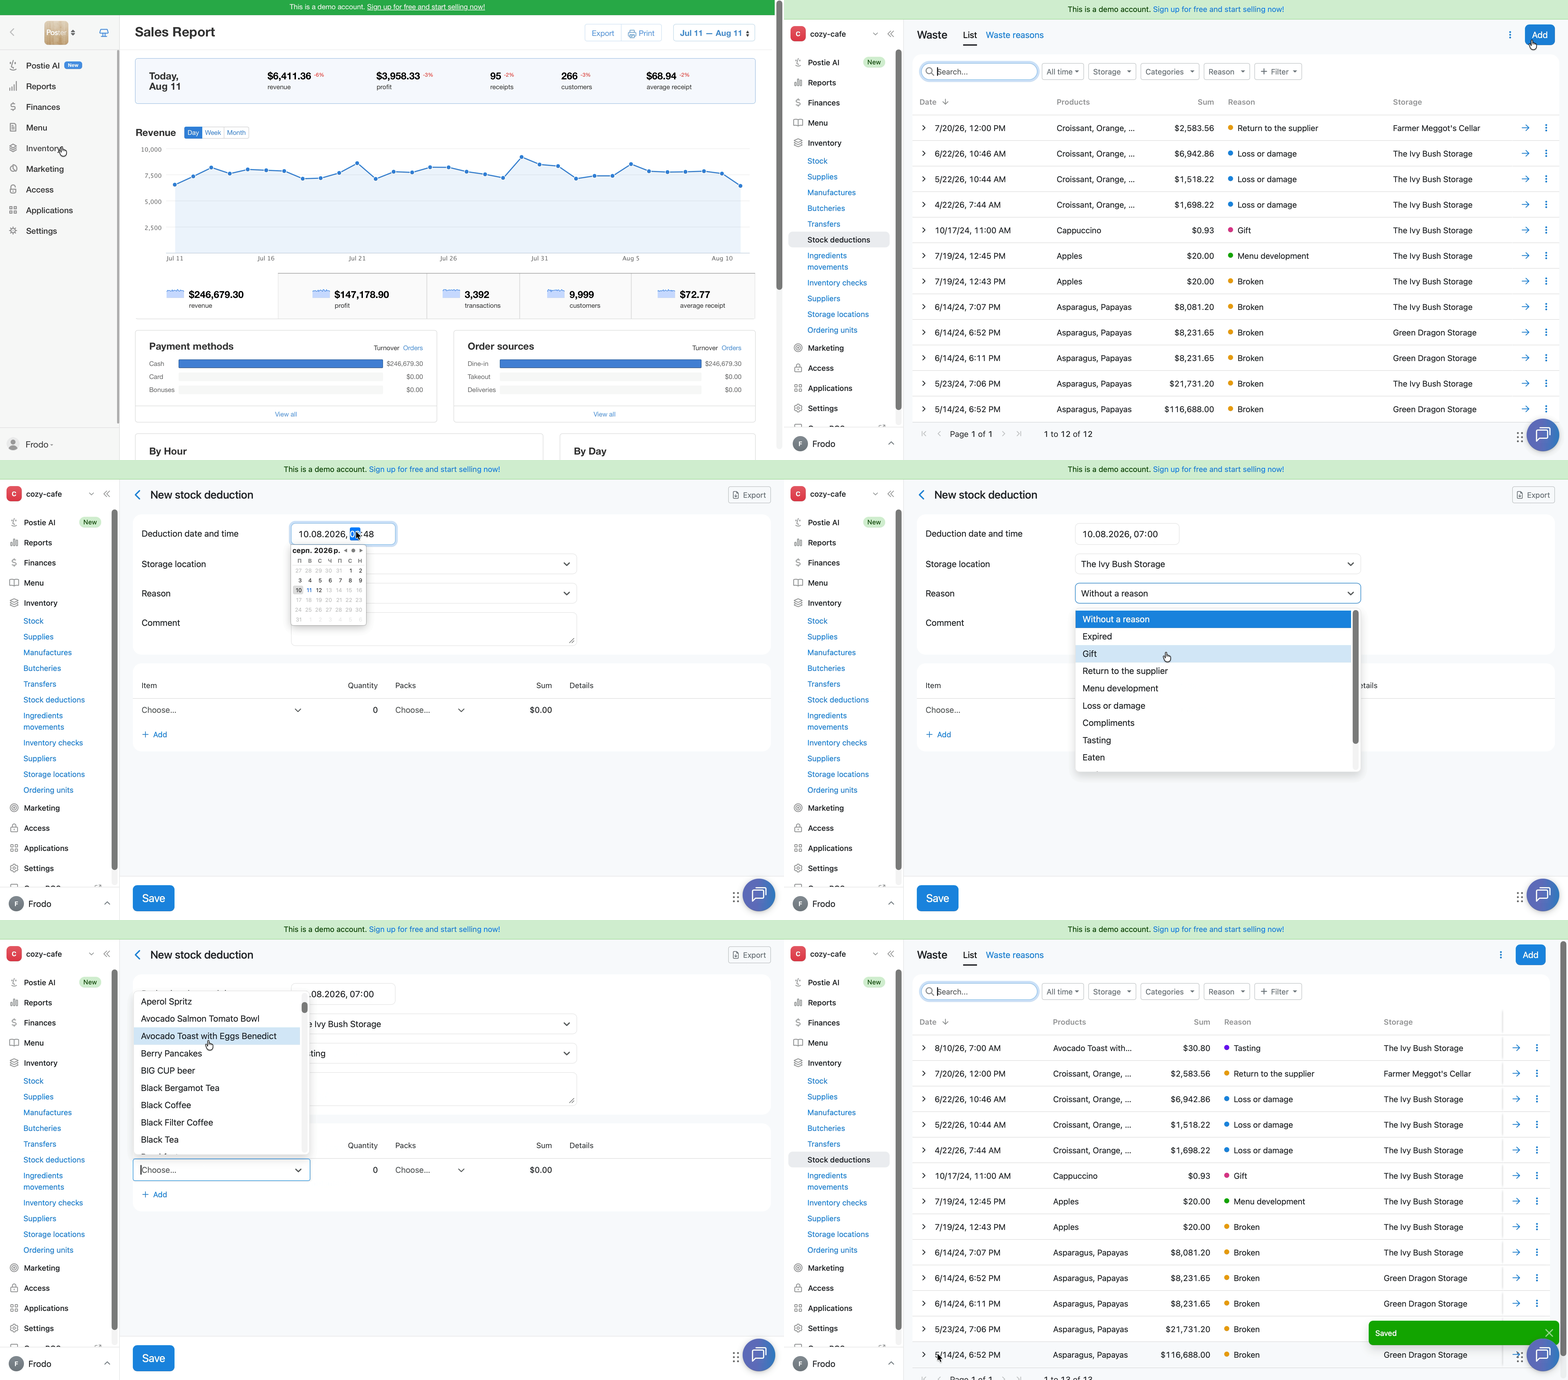
Poster calculates the stock deduction amount as the product quantity multiplied by its current cost using the weighted average cost method.
☝️ To select a past deduction date, make sure it falls within the open inventory period, meaning it is after the last inventory check for this storage location.
💡 To make a stock deduction directly at the POS, connect the Stock Deduction at the POS app.
View the product movements report
Check in the product movements report how many products and ingredients were received, used, or remained during the selected period.
💡 The product movements report is available only on the Mini, Business, and Pro plans.
- Open Inventory → Ingredients movements in the management console and select the reporting period in the calendar.
☝️ Data in the product movements report is displayed by calendar days, not POS shifts. - Select a storage location to view product movements and the cost of the stock balance there.
- If you have combined several locations into a network, select the required location. The report will show the stock balances in the storage locations linked to it.
- Select the stock type: ingredients, products, or produced dishes and preparations. If needed, select a category.
- Click + Filter to find specific products or ⿲ Columns to customize the columns displayed.
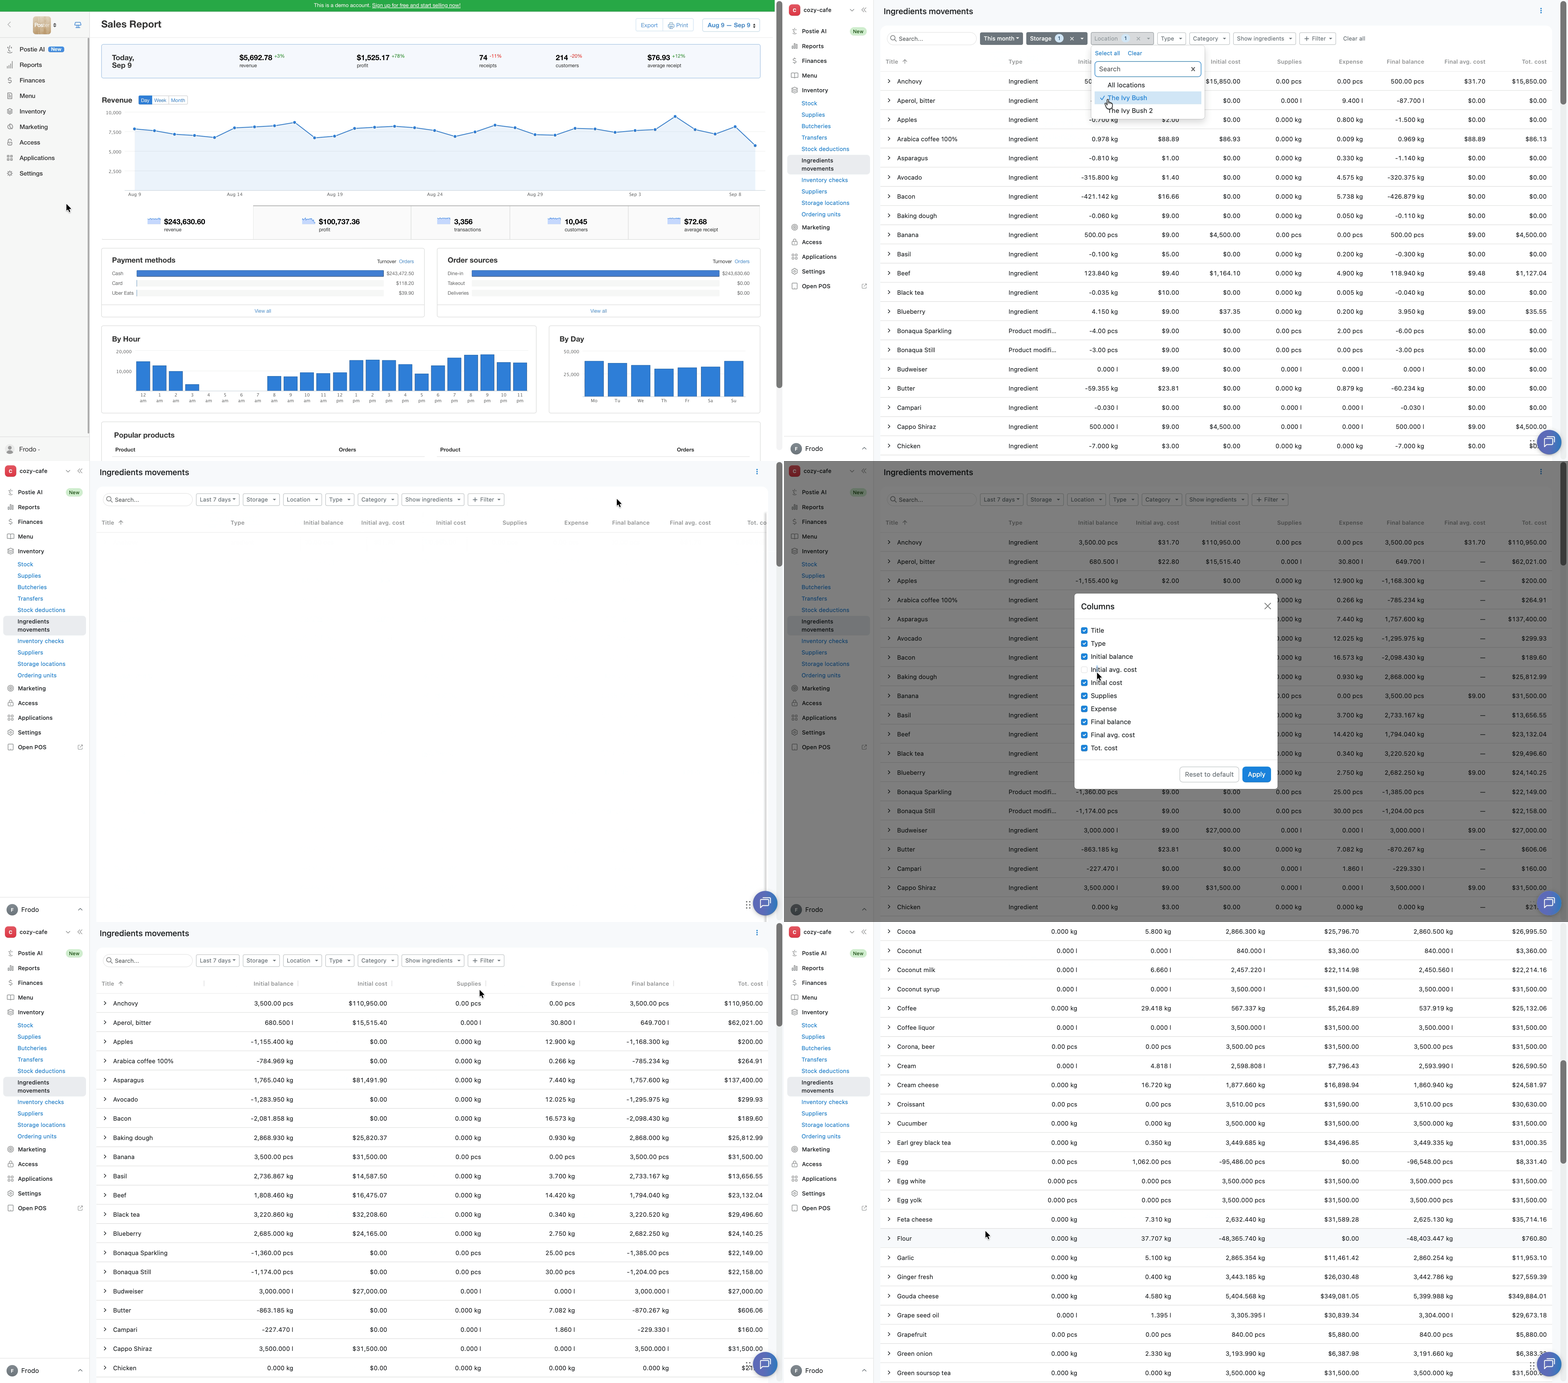
Review the following information in the report:
- The initial and final cost of products for the period.
- Supplies — the quantity and cost of products from supplies, manufacture, or inventory checks.
- Expense — the quantity and cost of products from sales, manual stock deductions, Manufacture, or inventory checks.
- Total — the overall values for all products.
Click ▼ next to the required row to view the details.
💡 To view only products that had movements during the selected period, select Show ingredients → With movement only.
To check all stock balances on a specific date, including products without movements, select Show ingredients → All, inc. without movements and review the Final balance column.
💡 Click Export to download the report in Excel format or Print to print it.
💡 For hourly analysis and to investigate the reasons for stock deductions, connect the free Transfers report app.
To receive notifications when ingredient stock is running low, turn on low stock notifications.
Run an inventory check
Run an inventory check to verify the actual product balances for the selected period. Poster compares the expected and actual balances and shows the difference in quantity and value.
💡 Inventory checks are available only on the Mini, Business, and Pro plans.
- Open Inventory → Inventory checks and click Add.
- Select the storage location where you will run the inventory check.
- Select the moment for which you want to check the balances:
- select Retrospective and specify the date and time when you counted the actual balances;
- select Current if you are counting the balances now.
- Select the inventory check type:
- select Full to check all products in the storage location;
- select Partial to check specific products or categories. Find them using quick search and select the checkboxes.
- Click Save.
- Fill in the Actual balance column. Specify the quantity of products and ingredients in the storage location — Poster will automatically calculate the difference in quantity and value.☝️ Check the Initial balance column to view the balances from the previous inventory check. The period of receipts and deductions for each product starts from the moment of its last inventory check.
- Click Run inventory check.

After you run the inventory check, Poster will set the actual balances of the products and ingredients you specified in the storage location as of the time of the inventory check.
💡 If needed, run an inventory check at the POS so employees can enter actual balances directly while counting.
💪🏻 If you have any questions about working with inventory, write to us in the chat — our support team will help you.